


Image to PES Converter Guide: Get Your Designs Ready for Brother Machines
If youre diving into machine embroidery and want to stitch custom artwork on your Brother embroidery machine, converting your image to a PES file is the first step. PES is the native file format used by Brother machines, and without it, your machine wont recognize the design. The process might sound technical, but dont worrywere breaking it down in the simplest way possible.
Pro tip: If you're not comfortable converting files yourself, or want the cleanest, most professional results, we highly recommend Digitizing Buddy. They offer affordable and high-quality custom embroidery digitizing services that convert your images to PES (and other formats) quickly and accurately. Great for beginners and pros alike!
What Is a PES File?
Before we jump into converters and software, lets cover the basics.
A PES file is a digital embroidery file format specifically designed for Brother and Babylock embroidery machines. It contains all the instructions your machine needs, including:
- Stitch type
- Stitch direction
- Color changes
- Thread stops
- Placement details
Simply put, its the embroidery version of a blueprint!
Why You Need to Convert Images to PES
Your machine cant read standard image formats like JPG, PNG, BMP, or SVG. These are just flat images, with no stitch data. An image might look great on your screen, but unless its been digitized into a stitch file like PES, your embroidery machine cant interpret it.
Image to PES converter is more than just changing a file extensionit's a process called embroidery digitizing. That means assigning stitch types, paths, density, and more. This is where good softwareor a reliable digitizing servicecomes into play.
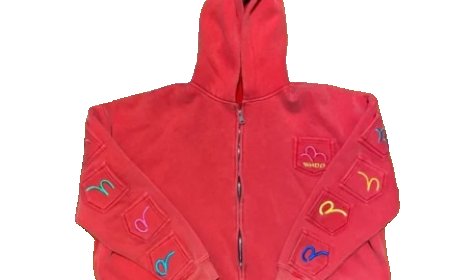
Types of Images You Can Convert
Not all images are embroidery-friendly right out of the gate. Here are some image types and how they fare:
Best Types for Conversion
- Simple logos
- Line art
- Vector graphics (SVG, EPS, AI)
- High-resolution black & white images
Difficult to Convert
- Photographs with gradients
- Low-resolution or blurry images
- Detailed artwork with thin lines or too many colors
While you can digitize photos, they usually require photo embroidery software or manual digitizing by an expert.
How to Convert an Image to PES (Step-by-Step Guide)
Lets go through the process of converting an image into a PES file.
Step 1: Choose a Digitizing Software
Youll need embroidery digitizing softwarenot just any image converter.
Here are some beginner-friendly and professional software options:
|
Software |
Skill Level |
Free/Paid |
PES Export Support |
|
Ink/Stitch |
Beginner |
Free |
? |
|
SewArt |
Beginner |
Paid (Free trial) |
? |
|
Embird |
Intermediate |
Paid |
? |
|
Wilcom Hatch |
Advanced |
Paid |
? |
|
Brother PE-Design |
Intermediate |
Paid |
? |
Step 2: Import the Image
Once your software is ready:
- Open the software.
- Click on "Import Image" or "Open File."
- Upload your image file (JPG, PNG, BMP, etc.).
Step 3: Clean Up the Image (Optional)
Most software will let you simplify or reduce colors in your image. This is especially useful for logos or clip art. Make sure:
- Backgrounds are removed (if not needed).
- Unwanted colors are eliminated.
- The lines are smooth and defined.
Step 4: Digitize the Image
Now comes the fun (and most technical) partdigitizing. Youll need to:
- Set stitch types (satin, fill, running, etc.)
- Assign thread colors
- Set stitch direction
- Define density & underlay
Many beginner software options, like SewArt or Ink/Stitch, offer auto-digitizing, which simplifies this process. However, manual digitizing always gives better results.
Step 5: Save or Export as PES
Once your image is digitized:
- Go to File > Export or Save As
- Choose PES (.pes) from the format options
- Save the file to your computer or directly to a USB drive
Youre now ready to load your PES file into your Brother embroidery machine!
Top Free Image to PES Converters (With Limitations)
If you're just testing the waters and dont want to buy software, a few free options can help, though they may be limited in quality or features:
Ink/Stitch (Free Extension for Inkscape)
- Converts SVG to PES
- Allows basic digitizing
- Works on Windows, Mac & Linux
- Slight learning curve
SewArt (Free Trial)
- Drag-and-drop interface
- Simple auto-digitizing
- PES file support
- 30-day free trial
Note: Free converters often dont give you control over the stitch types or paths, which can lead to sloppy embroidery. Always test your design on scrap fabric first!
Common Mistakes to Avoid
Avoid these rookie errors when converting images to PES:
Uploading low-resolution or blurry images
This leads to poor stitch paths and messy embroidery.
Using too many colors
Keep it simple. Most embroidery machines are limited in how many threads you can use without rethreading.
Relying only on auto-digitizing
While fast, it often misses important details or chooses inefficient stitch paths.
Not testing the design
Always do a test stitch-out before using the design on final garments.
What to Do if Youre Not Tech-Savvy
If this process feels overwhelming, you're not alone! Digitizing is both an art and a scienceand many people prefer to hand it off to professionals.
Thats why services like Digitizing Buddy exist. You send them your image, and they return a perfectly clean PES file, ready to load into your Brother machine. They handle all the tricky stufflike stitch type, density, and trimsso you can just focus on the fun part: stitching!
Tips for Best Results on Brother Machines
Here are a few bonus tips to ensure success with your PES file:
- Use the correct hoop size: Match the design size to your machines embroidery area.
- Choose high-quality thread: Cheap threads can break and ruin your design.
- Stabilize properly: Always use the right stabilizer to avoid puckering.
- Preview on-screen: Brother machines usually have a preview functionuse it to check colors and alignment.
Final Thoughts
Converting an image to PES format might sound intimidating at first, but with the right tools and a bit of practice, it becomes second nature. Whether you choose to DIY with software or save time by using a service like Digitizing Buddy, the end goal is the same: getting your creative designs onto fabric.
So go aheadbring your logos, icons, or hand-drawn sketches to life with your Brother embroidery machine. Your designs deserve to shine in thread!